SpringCloud
第 1 章 简介
1.1 微服务简介
“微服务”一词来源于 Martin Fowler 的《Microservices》一文。微服务是一种架构风格,即将单体应用划分为小型的服务单元,微服务之间使用 HTTP 的 API 进行资源访问与操作。
1.1.1 微服务架构优势
1、服务的独立部署
每个服务都是一个独立的项目,可以独立部署,不依赖于其他服务,耦合性低。
2、服务的快速启动
拆分之后服务启动的速度必然要比拆分之前快很多,因为依赖的库少了,代码量也少了。
3、更加适合敏捷开发
敏捷开发以用户的需求进化为核心,采用迭代、循序渐进的方法进行。服务拆分可以快速发布新版本,修改哪个服务只需要发布对应的服务即可,不用整体重新发布。
4、职责专一,由专门的团队负责专门的服务
业务发展迅速时,研发人员也会越来越多,每个团队可以负责对应的业务线,服务的拆分有利于团队之间的分工。
5、服务可以动态按需扩容
当某个服务的访问量较大时,我们只需要将这个服务扩容即可。
6、代码的复用
每个服务都提供 REST API,所有的基础服务都必须抽出来,很多的底层实现都可以以接口方式提供。
1.1.2 微服务架构劣势
1、分布式部署,调用的复杂性高
单体应用的时候,所有模块之前的调用都是在本地进行的,在微服务中,每个模块都是独立部署的,通过 HTTP 来进行通信,这当中会产生很多问题,比如网络问题、容错问题、调用关系等。
2、独立的数据库,分布式事务的挑战
每个微服务都有自己的数据库,这就是所谓的去中心化的数据管理。这种模式的优点在于不同的服务,可以选择适合自身业务的数据,比如订单服务可以用 MySQL、评论服务可以用 Mongodb、商品搜索服务可以用 Elasticsearch。
缺点就是事务的问题了,目前最理想的解决方案就是柔性事务中的最终一致性,后面的章节会给大家做具体介绍。
3、测试的难度提升
服务和服务之间通过接口来交互,当接口有改变的时候,对所有的调用方都是有影响的,这时自动化测试就显得非常重要了,如果要靠人工一个个接口去测试,那工作量就太大了。这里要强调一点,就是 API 文档的管理尤为重要。
4、运维难度的提升
在采用传统的单体应用时,我们可能只需要关注一个 Tomcat 的集群、一个 MySQL 的集群就可以了,但这在微服务架构下是行不通的。当业务增加时,服务也将越来越多,服务的部署、监控将变得非常复杂,这个时候对于运维的要求就高了。
1.2 SpringCloud 简介
SpringCloud 是开发分布式系统的“全家桶”,是一系列框架的有序集合。SpringCloud 利用 SpringBoot 的开发便利性巧妙地简化了分布式系统基础设施的开发。如服务注册、服务发现、配置中心、消息总线、负载均衡、断路器、数据监控等,这些都可以用 SpringBoot 的开发风格做到一键启动和部署。
通俗地讲,SpringCloud 就是用于构建微服务开发和治理的框架集合(并不是具体的一个框架),主要贡献来自 Netflix OSS。
SpringCloud 对于中小型互联网公司来说是一种福音,使用 SpringCloud 一站式解决方案能在从容应对业务发展的同时大大减少开发成本。
1.2.1 SpringCloud 模块介绍
Spring Cloud 模块的相关介绍如下:
- Eureka:服务注册中心,用于服务管理。
- Ribbon:基于客户端的负载均衡组件。
- Hystrix:容错框架,能够防止服务的雪崩效应。
- Feign:Web 服务客户端,能够简化 HTTP 接口的调用。
- Zuul:API 网关,提供路由转发、请求过滤等功能。
- Config:分布式配置管理。
- Sleuth:服务跟踪。
- Stream:构建消息驱动的微服务应用程序的框架。
- Bus:消息代理的集群消息总线。
除了上述常用模块,还有 Cli、Task等。
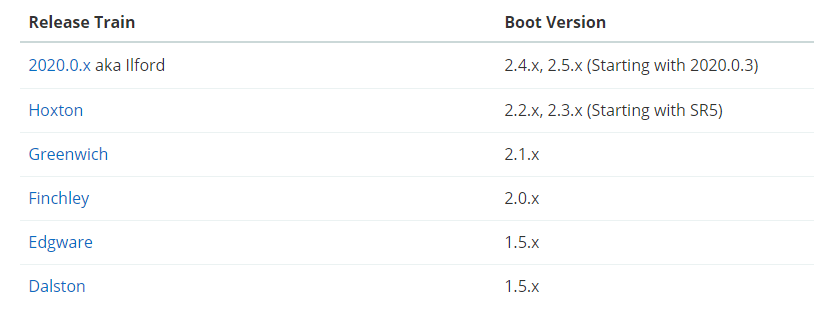
1.2.2 SpringCloud 版本介绍
需要选择稳定且相对应的 SpringCloud 以及 SpringBoot 版本。
第 2 章 Eureka
2.1 注册中心
2.1.1 概述
注册中心可以说是微服务架构中的“通讯录”,它记录了服务和服务地址的映射关系。在分布式系统中,服务会注册到这里,当服务需要调用其它服务时,就到这里找到服务的地址,进行调用。简单的来说:服务注册中心的作用就是服务的注册和服务的发现。
在分布式系统中,我们不仅仅是需要在注册中心找到服务和服务地址的映射关系这么简单,我们还需要考虑更多更复杂的问题:
- 服务注册后,如何及时发现
- 服务宕机后,如何及时下线
- 服务发现时,如何进行路由
- 服务异常时,如何进行降级
- 服务如何有效的水平扩展
这些问题的解决都依赖于注册中心。简单来看,注册中心的功能有点类似于 DNS 服务器或者负载均衡器,而实际上,注册中心作为微服务的基础组件,可能要更加复杂,也需要更多的灵活性和时效性。所以,我们还需要学习更多 Spring Cloud 微服务组件协同完成应用开发。
2.1.2 常见的注册中心
| 特性 | Eureka(会用) | Nacos(重点) | Consul(了解) | Zookeeper(了解) |
|---|---|---|---|---|
| CAP | AP | CP + AP | CP | CP |
| 健康检查 | Client Beat | TCP/HTTP/MYSQL/Client Beat | TCP/HTTP/gRPC/Cmd | Keep Alive |
| 雪崩保护 | 有 | 有 | 无 | 无 |
| 自动注销实例 | 支持 | 支持 | 不支持 | 支持 |
| 访问协议 | HTTP | HTTP/DNS | HTTP/DNS | TCP |
| 监听支持 | 支持 | 支持 | 支持 | |
| 多数据中心 | 支持 | 支持 | 支持 | 不支持 |
| 跨注册中心同步 | 不支持 | 支持 | 支持 | 不支持 |
| SpringCloud集成 | 支持 | 支持 | 支持 | 支持 |
2.2 Eureka 简介
2.2.1 概述
Spring Cloud Eureka 是 Spring Cloud Netflix 微服务套件的一部分,基于 Netflix Eureka 做了二次封装,主要负责实现微服务架构中的服务治理功能。
Spring Cloud Eureka 是一个基于 REST 的服务,并且提供了基于 Java 的客户端组件,能够非常方便地将服务注册到 Spring Cloud Eureka 中进行统一管理。
在分布式系统领域有个著名的 CAP 定理,即 C 为数据一致性;A 为服务可用性;P 为服务对网络分区故障的容错性。这三个特性在任何分布式系统中都不能同时满足,最多同时满足两个。想要保证 AP 就要用 Eureka,想要保证 CP 就要用 Zookeeper。
Eureka 是 Netflix 开源的一款提供服务注册和发现的产品,它提供了完整的 Service Registry 和 Service Discovery 实现。也是 SpringCloud 体系中最重要最核心的组件之一。
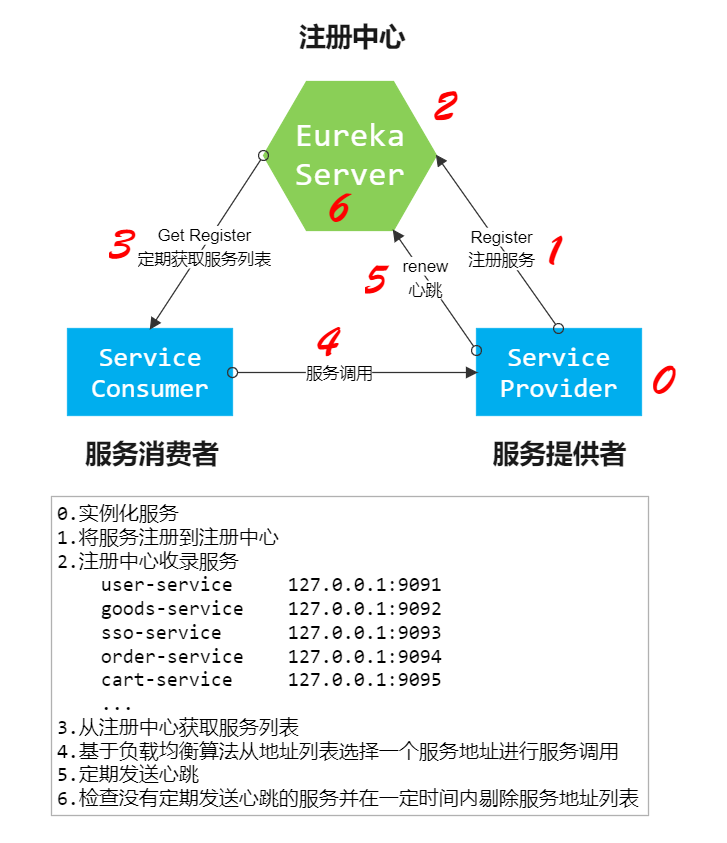
2.2.2 Eureka 角色
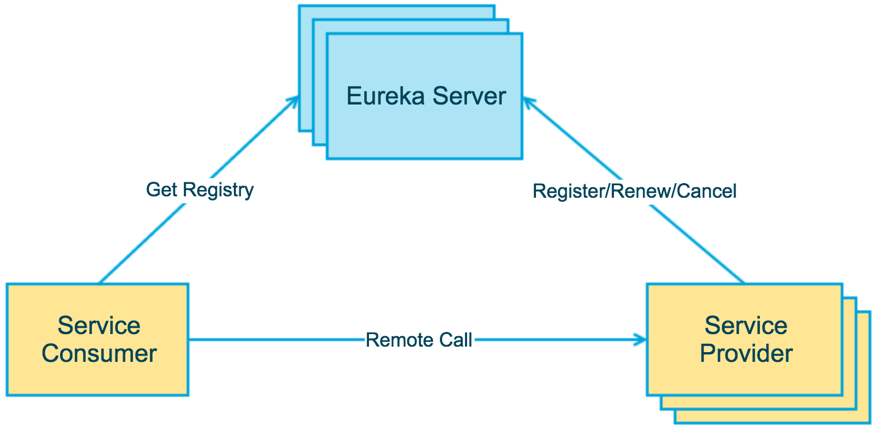
- Eureka Server:通过 Register、Get、Renew 等接口提供服务的注册和发现。
- Service Provider:服务提供方,把自身的服务实例注册到 Eureka Server 中。
- Service Consumer:服务调用方,通过 Eureka Server 获取服务列表,消费服务。
2.2.3 Eureka 运行流程
2.3 Eureka 入门
注意:此时一定要注意 SpringBoot 和 SpringCloud 的版本是否对应,版本不对应会出现问题。
2.3.1 搭建服务注册中心
1、导入依赖
<?xml version="1.0" encoding="UTF-8"?>

<project xmlns="http://maven.apache.org/POM/4.0.0" xmlns:xsi="http://www.w3.org/2001/XMLSchema-instance"
         xsi:schemaLocation="http://maven.apache.org/POM/4.0.0 http://maven.apache.org/xsd/maven-4.0.0.xsd">
    <modelVersion>4.0.0</modelVersion>
    <!-- Spring Boot -->
    <parent>
        <groupId>org.springframework.boot</groupId>
        <artifactId>spring-boot-starter-parent</artifactId>
        <version>2.0.6.RELEASE</version>
        <relativePath/>
    </parent>

    <groupId>com.luochen</groupId>
    <artifactId>eureka-server9001</artifactId>
    <version>1.0</version>

    <name>eureka-server9001</name>

    <properties>
        <project.build.sourceEncoding>UTF-8</project.build.sourceEncoding>
        <maven.compiler.source>1.8</maven.compiler.source>
        <maven.compiler.target>1.8</maven.compiler.target>
    </properties>
    <dependencies>
        <!-- eureka-Server依赖启动器 -->
        <dependency>
            <groupId>org.springframework.cloud</groupId>
            <artifactId>spring-cloud-starter-netflix-eureka-server</artifactId>
        </dependency>

        <dependency>
            <groupId>junit</groupId>
            <artifactId>junit</artifactId>
            <version>4.11</version>
            <scope>test</scope>
        </dependency>
    </dependencies>

    <!-- Spring Cloud -->
    <dependencyManagement>
        <dependencies>
            <dependency>
                <groupId>org.springframework.cloud</groupId>
                <artifactId>spring-cloud-dependencies</artifactId>
                <version>Finchley.SR2</version>
                <type>pom</type>
                <scope>import</scope>
            </dependency>
        </dependencies>
    </dependencyManagement>
</project>
2、主启动类
Eureka Server 主启动类只需要在原来的主启动类上加上 @EnableEurekaServer 注解即可。
package com.luochen;

import org.springframework.boot.SpringApplication;
import org.springframework.boot.autoconfigure.SpringBootApplication;
import org.springframework.cloud.netflix.eureka.server.EnableEurekaServer;

/**
 * @author 洛尘大大
 * @description: Eureka Server注册中心
 * @date 2021/12/2 9:55
 */
@SpringBootApplication
@EnableEurekaServer // 开启Eureka Server
public class EurekaServer {
    public static void main(String[] args) {
        SpringApplication.run(EurekaServer.class, args);
    }
}
3、配置文件
server:
  port: 9001

spring:
  application:
    # 该名称在集群模式下应该保持一致
    name: eureka-server

eureka:
  instance:
    # 服务注册中心实例的主机名
    hostname: localhost
  client:
    # 是否将自己注册到注册中心,默认为 true,单实例模式下需要设置为 false
    register-with-eureka: false
    # 是否从注册中心获取服务注册信息,默认为 true,单实例模式下需要设置为 false
    fetch-registry: false
    # 注册中心对外暴露的注册地址
    service-url:
      defaultZone: http://${eureka.instance.hostname}:${server.port}/eureka/
服务成功启动后,访问配置文件中设置的注册地址,出现以下内容表示服务注册中心成功。

2.3.2 创建服务提供者
将一个服务提供者注册到 Eureka 中,并提供一个接口给其他服务调用。
1、导入依赖
<?xml version="1.0" encoding="UTF-8"?>

<project xmlns="http://maven.apache.org/POM/4.0.0" xmlns:xsi="http://www.w3.org/2001/XMLSchema-instance"
         xsi:schemaLocation="http://maven.apache.org/POM/4.0.0 http://maven.apache.org/xsd/maven-4.0.0.xsd">
    <modelVersion>4.0.0</modelVersion>

    <!-- Spring Boot -->
    <parent>
        <groupId>org.springframework.boot</groupId>
        <artifactId>spring-boot-starter-parent</artifactId>
        <version>2.0.6.RELEASE</version>
        <relativePath/>
    </parent>

    <groupId>com.luochen</groupId>
    <artifactId>service-provider8001</artifactId>
    <version>1.0</version>

    <name>service-provider8001</name>

    <properties>
        <project.build.sourceEncoding>UTF-8</project.build.sourceEncoding>
        <maven.compiler.source>1.8</maven.compiler.source>
        <maven.compiler.target>1.8</maven.compiler.target>
    </properties>

    <dependencies>
        <!-- 开启Web服务 -->
        <dependency>
            <groupId>org.springframework.boot</groupId>
            <artifactId>spring-boot-starter-web</artifactId>
        </dependency>

        <!-- Eureka Client依赖启动器 -->
        <dependency>
            <groupId>org.springframework.cloud</groupId>
            <artifactId>spring-cloud-starter-netflix-eureka-client</artifactId>
        </dependency>
    </dependencies>

    <!-- Spring Cloud -->
    <dependencyManagement>
        <dependencies>
            <dependency>
                <groupId>org.springframework.cloud</groupId>
                <artifactId>spring-cloud-dependencies</artifactId>
                <version>Finchley.SR2</version>
                <type>pom</type>
                <scope>import</scope>
            </dependency>
        </dependencies>
    </dependencyManagement>
</project>
2、主启动类
package com.luochen;

import org.springframework.boot.SpringApplication;
import org.springframework.boot.autoconfigure.SpringBootApplication;
import org.springframework.cloud.client.discovery.EnableDiscoveryClient;

/**
 * @author 洛尘大大
 * @description: 服务提供者
 * @date 2021/12/2 10:30
 */
@SpringBootApplication
@EnableDiscoveryClient
/**
 * 相同点:@EnableDiscoveryClient 和 EnableEurekaClient都是能够让注册中心能够发现,扫描到该服务。
 *
 * 不同点:@EnableEurekaClient只适用于Eureka作为注册中心,@EnableDiscoveryClient 可以是其他注册中心。
 */
public class ServiceProvider {
    public static void main(String[] args) {
        SpringApplication.run(ServiceProvider.class, args);
    }
}
3、配置文件
server:
  port: 8001

spring:
  application:
    # 该名称在集群模式下应该保持一致
    name: service-provider

eureka:
  instance:
    # 是否使用 ip 地址注册
    prefer-ip-address: true
    # 该实例注册到服务中心的唯一ID
    instance-id: ${spring.cloud.client.ip-address}:${server.port}
  client:
    # 设置服务注册中心地址
    service-url:
      defaultZone: http://localhost:9001/eureka/
4、编写 Controller 测试类
目的是为了提供服务,被其它微服务捕捉。
package com.luochen.controller;

import org.springframework.web.bind.annotation.GetMapping;
import org.springframework.web.bind.annotation.RestController;

/**
 * @author 洛尘大大
 * @description: 服务测试
 * @date 2021/12/2 10:43
 */
@RestController
public class UserController {

    @GetMapping("/userTest")
    public String userTest(){
        return "你好";
    }
}
服务提供者启动后,出现以下画面:
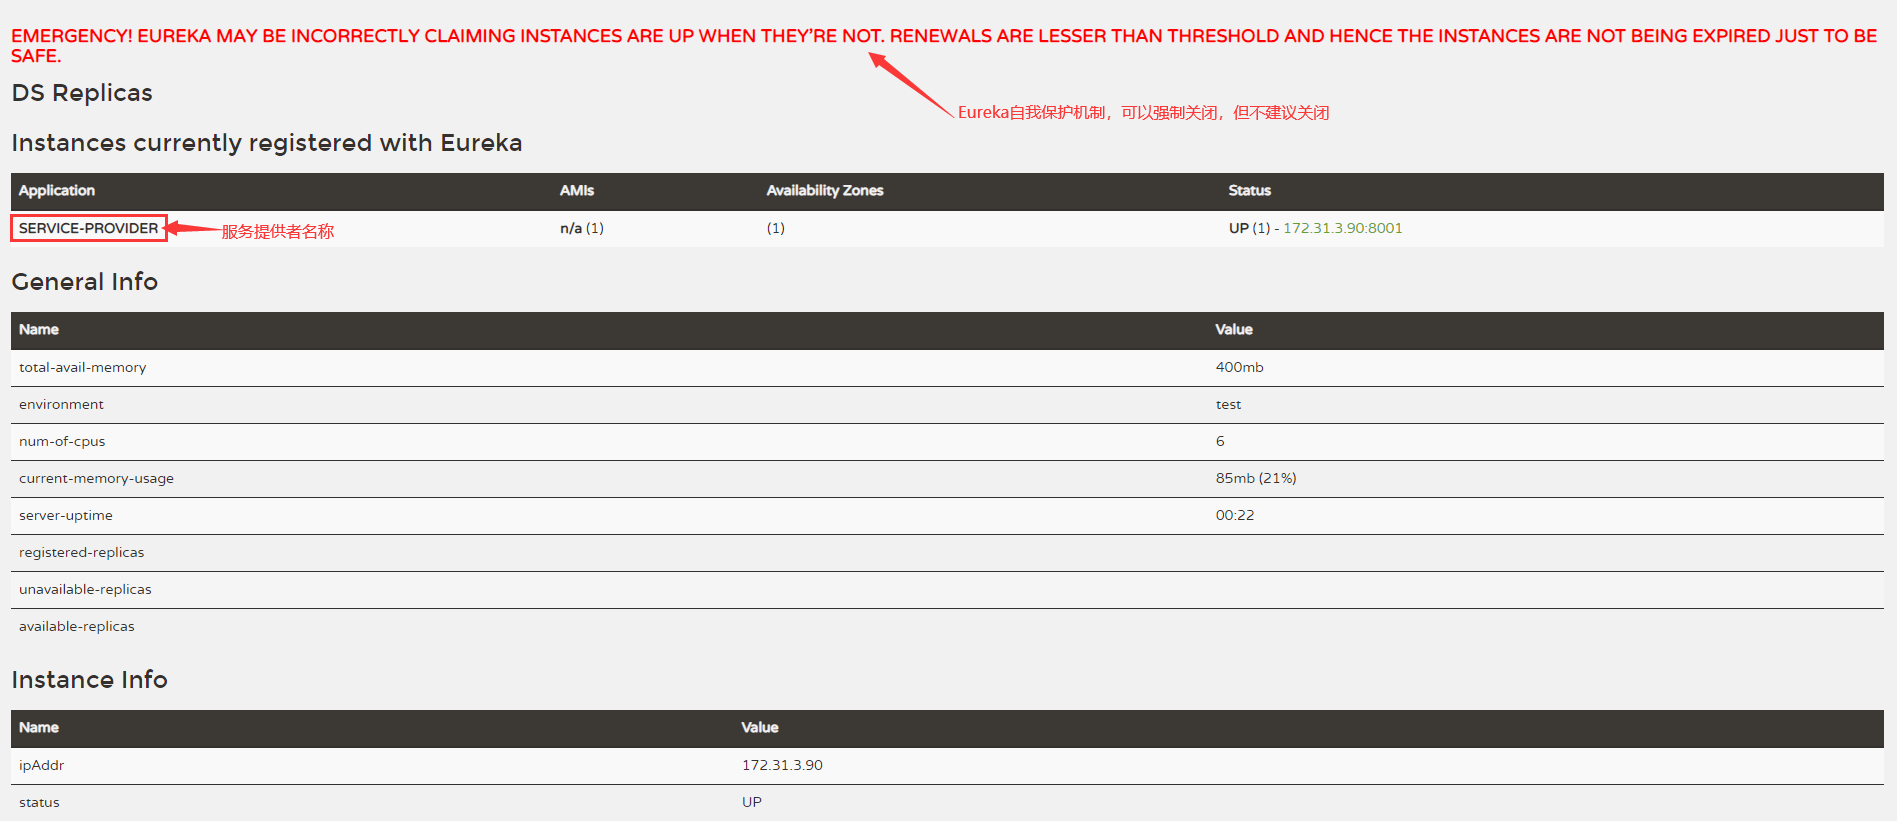
强制关闭保护模式:
eureka:
  server:
    enable-self-preservation: false
2.3.3 创建服务消费者
消费服务提供者的服务接口。
服务消费者的依赖、主启动类与服务提供者一致。
配置文件:
server:
  port: 8002

spring:
  application:
    name: service-consumer8002

eureka:
  client:
    # 是否将自己注册到注册中心,默认为 true
    register-with-eureka: false
    # 表示 Eureka Client 间隔多久去服务器拉取注册信息,默认为 30 秒
    registry-fetch-interval-seconds: 10
    # 设置服务注册中心地址
    service-url:
      defaultZone: http://localhost:9001/eureka/
1、直接调用接口
RestTemplate 是 Spring 提供的用于访问 Rest 服务的客户端,RestTemplate 提供了多种便捷访问远程 Http 服务的方法,能够大大提高客户端的编写效率。我们通过配置 RestTemplate 来调用接口,创建 config 包,编写配置类,代码如下所示。
package com.luochen.config;

import org.springframework.context.annotation.Bean;
import org.springframework.context.annotation.Configuration;
import org.springframework.web.client.RestTemplate;

/**
 * @author 洛尘大大
 * @description: Bean实例化配置类
 * @date 2021/12/2 11:26
 */
@Configuration // 标注配置类
public class BeanConfiguration {

    @Bean // 注册bean
    public RestTemplate restTemplate() {
        return new RestTemplate();
    }
}
创建 controller 包,创建测试类,用于消费服务提供者提供的服务。
package com.luochen.controller;

import org.springframework.beans.factory.annotation.Autowired;
import org.springframework.web.bind.annotation.GetMapping;
import org.springframework.web.bind.annotation.RestController;
import org.springframework.web.client.RestTemplate;

/**
 * @author 洛尘大大
 * @description: 直接调用
 * @date 2021/12/2 11:28
 */
@RestController
public class UserController {
    @Autowired
    private RestTemplate restTemplate;

    @GetMapping("/consumer/userTest")
    public String userTest() {
        // 参数:访问路径,返回类型
        return restTemplate.getForObject("http://localhost:8001/userTest", String.class);
    }
}
2、通过 Eureka 来消费接口
上面提到的方法是直接通过服务接口的地址来调用的,完全没有用到 Eureka 带给我们的便利。既然用了注册中心,那么客户端调用的时候肯定是不需要关心有多少个服务提供接口,下面我们来改造之前的调用代码。
改造配置代码:
package com.luochen.config;

import org.springframework.cloud.client.loadbalancer.LoadBalanced;
import org.springframework.context.annotation.Bean;
import org.springframework.context.annotation.Configuration;
import org.springframework.web.client.RestTemplate;

/**
 * @author 洛尘大大
 * @description: Bean实例化配置类
 * @date 2021/12/2 11:26
 */
@Configuration // 标注配置类
public class BeanConfiguration {

    @Bean // 注册bean
    @LoadBalanced // 方便我们对RestTemplate添加一个LoadBalancerClient,以实现客户端负载均衡
    public RestTemplate restTemplate() {
        return new RestTemplate();
    }
}
接下来就是改造调用代码,我们不再直接写固定地址,而是写成服务的名称,这个名称就是我们注册到 Eureka 中的名称,是属性文件中的 spring.application.name,相关代码如下所示。
改造 controller 层中的调用代码:
package com.luochen.controller;

import org.springframework.beans.factory.annotation.Autowired;
import org.springframework.web.bind.annotation.GetMapping;
import org.springframework.web.bind.annotation.RestController;
import org.springframework.web.client.RestTemplate;

/**
 * @author 洛尘大大
 * @description: 直接调用
 * @date 2021/12/2 11:28
 */
@RestController
public class UserController {
    @Autowired
    private RestTemplate restTemplate;

    @GetMapping("/consumer/userTest")
    public String userTest() {
        // 配置服务名称即可,不需要写具体的服务地址
        return restTemplate.getForObject("http://service-provider/userTest", String.class);
    }
}
2.4 Eureka 集群搭建
即搭建多个 Eureka 注册中心,这些注册中心,相互注册,构成一个整体,使得任意分布在集群的某台服务器上的服务消费者能消费服务提供者提供的服务。
Eureka 集群搭建,分为多机部署和单机部署。
- 多机部署:仅仅将不同机器的 IP 地址,配置到配置文件中即可。
- 单机部署:由于 Eureka 会把 hostname 相同的 url 移除掉,因此需要添加域名映射。
1、添加域名映射
单机搭建集群,修改 C:\Windows\System32\drivers\etc\hosts 文件,添加域名映射,可以添加多个。
# 域名映射,即将前面的地址映射为后面自定义的任意地址,只需要访问后面的地址,即可访问到本地
127.0.0.1 eureka-server1011.com
127.0.0.1 eureka-server1012.com
2、修改注册中心一的配置文件
server:
  port: 9001

spring:
  application:
    # 该名称在集群模式下应该保持一致
    name: eureka-server

eureka:
  instance:
    # 服务注册中心实例的主机名
    hostname: eureka-server6001.com
    # 是否使用 ip 地址注册
    prefer-ip-address: true
    # 该实例注册到服务中心的唯一ID
    instance-id: ${spring.cloud.client.ip-address}:${server.port}
  client:
    # 是否将自己注册到注册中心,默认为 true,单实例模式下需要设置为 false
    register-with-eureka: false
    # 指向另一个注册中心,除自己外,用逗号隔开
    service-url:
      defaultZone: http://eureka-server6002.com:9002/eureka/
2、修改注册中心二的配置文件
server:
  port: 9002

spring:
  application:
    # 该名称在集群模式下应该保持一致
    name: eureka-server

eureka:
  instance:
    # 服务注册中心实例的主机名
    hostname: eureka-server6002.com
    # 是否使用 ip 地址注册
    prefer-ip-address: true
    # 该实例注册到服务中心的唯一ID
    instance-id: ${spring.cloud.client.ip-address}:${server.port}
  client:
    # 是否将自己注册到注册中心,默认为 true,单实例模式下需要设置为 false
    register-with-eureka: false
    # 指向另一个注册中心,除自己外,用逗号隔开
    service-url:
      defaultZone: http://eureka-server6001.com:9001/eureka/
启动成功后:

添加服务提供者和消费者中注册的地址,保证注册到集群中,此时,任意消费者能消费提供者的提供的接口服务。
第 3 章 Ribbon
3.1 简介
3.1.1 概述
一般来说,在生产环境中,各个微服务都会部署多个实例。那么消费者要如何将请求分摊到多个服务提供者实例上呢?负载均衡在系统架构中是一个非常重要,不得不去实施的内容,负载均衡是对系统的高可用、网络压力的缓解和处理能力扩容的重要手段之一。
负载均衡分为:
- 服务端负载均衡,其中分为硬件负载均衡(如 F5)和软件负载均衡(如 Nginx)。
- 客户端负载均衡:Ribbon 是 NetFlix 发布的客户端负载均衡器,它有助于控制 HTTP 和 TCP 客户端的行为。
通过 SpringCloud 的封装,可以让我们轻松的将面向服务的 REST 模板请求自动转换成客户端负载均衡的服务调用。Spring Cloud Ribbon 虽然只是一个工具类框架,它不像服务注册中心、配置中心、API 网关那样需要独立部署,但是它几乎存在于每一个 SpringCloud 构建的微服务和基础设施中。
3.1.2 Ribbon 模块
| 名 称 | 说 明 |
|---|---|
| ribbon-loadbalancer | 负载均衡模块,可独立使用,也可以和别的模块一起使用。 |
| ribbon | 内置的负载均衡算法都实现在其中。 |
| ribbon-eureka | 基于 Eureka 封装的模块,能够快速、方便地集成 Eureka。 |
| ribbon-transport | 基于 Netty 实现多协议的支持,比如 HTTP、Tcp、Udp 等。 |
| ribbon-httpclient | 基于 Apache HttpClient 封装的 REST 客户端,集成了负载均衡模块,可以直接在项目中使用来调用接口。 |
| ribbon-example | Ribbon 使用代码示例,通过这些示例能够让你的学习事半功倍。 |
| ribbon-core | 一些比较核心且具有通用性的代码,客户端 API 的一些配置和其他 API 的定义。 |
3.1.3 依赖启动器
<dependency>
    <groupId>org.springframework.cloud</groupId>
    <artifactId>spring-cloud-starter-netflix-ribbon</artifactId>
</dependency>
第 4 章 Feign
4.1 概述
Feign 是一个声明式的 REST 客户端,它能让 REST 调用更加简单。Feign 供了 HTTP 请求的模板,通过编写简单的接口和插入注解,就可以定义好 HTTP 请求的参数、格式、地址等信息。
而 Feign 则会完全代理 HTTP 请求,我们只需要像调用方法一样调用它就可以完成服务请求及相关处理。
Spring Cloud 对 Feign 进行了封装,使其支持 SpringMVC 标准注解和 HttpMessageConverters。Feign 可以与 Eureka 和 Ribbon 组合使用以支持负载均衡。
Feign 使得消费者更方便调用提供者的接口。
4.2 Feign 入门
4.2.1 导入启动依赖
<dependency>
    <groupId>org.springframework.cloud</groupId>
    <artifactId>spring-cloud-starter-openfeign</artifactId>
</dependency>
4.2.2 主类配置
添加 @EnableFeignClients 注解,如果待扫描包与主启动类不在同一个子包,则必须配置扫描包路径。
package com.luochen;

import org.springframework.boot.SpringApplication;
import org.springframework.boot.autoconfigure.SpringBootApplication;
import org.springframework.cloud.client.discovery.EnableDiscoveryClient;
import org.springframework.cloud.openfeign.EnableFeignClients;

/**
 * @author 洛尘大大
 * @description: Feign注解配置主启动类
 * @date 2021/12/2 11:18
 */
@SpringBootApplication
@EnableDiscoveryClient
@EnableFeignClients("com.luochen.client") // 开启Feign,如果待扫描包与主启动类不在同一个子包,则必须配置扫描包路径
public class ServiceConsumer {
    public static void main(String[] args) {
        SpringApplication.run(ServiceConsumer.class, args);
    }
}
4.2.3 Feign 客户端配置类
创建配置类,目的是为了简化调用,之后消费者像在本地一样直接调用方法即可。
我这里消费者创建 client 包,并在该包创建 Feign 客户端配置类。
使用 @FeignClient(“服务名称”) 注解。
package com.luochen.client;

import org.springframework.cloud.openfeign.FeignClient;
import org.springframework.web.bind.annotation.GetMapping;

/**
 * @author 洛尘大大
 * @description: Feign客户端接口
 * @date 2021/12/2 17:57
 */
@FeignClient("service-provider") // Feign客户端,参数即为待调用服务的名称
public interface FeignUserTest {
    // 该路径是提供者中提供的路劲接口,只要消费者调用该方法,即可映射到该路径
    @GetMapping("//userTest")
    String hello();
}
4.2.4 消费者调用接口类
使用 Feign 调用接口更方便实现接口。
package com.luochen.controller;

import com.luochen.client.FeignUserTest;
import org.springframework.beans.factory.annotation.Autowired;
import org.springframework.web.bind.annotation.GetMapping;
import org.springframework.web.bind.annotation.RestController;
import org.springframework.web.client.RestTemplate;

/**
 * @author 洛尘大大
 * @description: 直接调用@FeignClient注解类中的方法
 * @date 2021/12/2 11:28
 */
@RestController
public class UserController {
    @Autowired
    private RestTemplate restTemplate;

    @Autowired
    private FeignUserTest feignUserTest;

    @GetMapping("/consumer/userTest")
    public String userTest() {
        // 配置服务名称
        //return restTemplate.getForObject("http://service-provider/userTest", String.class);

        // Feign调用接口
        return feignUserTest.hello();
    }
}
4.3 Feign 自定义配置
第 5 章 Hystrix
在分布式环境中,许多服务依赖项中的一些必然会失败。Hystrix 是一个库,通过添加延迟容忍和容错逻辑,帮助你控制这些分布式服务之间的交互。Hystrix 通过隔离服务之间的访问点、停止级联失败和提供回退选项来实现这一点,所有这些都可以提高系统的整体弹性。
在微服务架构下,很多服务都相互依赖,如果不能对依赖的服务进行隔离,那么服务本身也有可能发生故障,Hystrix 通过 HystrixCommand 对调用进行隔离,这样可以阻止故障的连锁效应,能够让接口调用快速失败并迅速恢复正常,或者回退并优雅降级。